
This article will teach you how to develop and deploy a Minecraft plugin for a Paper server, using the Bukkit API. As a toy example, you will learn all the steps necessary to create a plugin that allows players to craft special compasses that can teleport them to their linked lodestones. This is going to be a complete guide, covering all aspects of plugin development: from how to set up the project using IntelliJ IDEA, to how to integrate it with bStats to collect metrics.
Introduction
Minecraft is one of those games that requires no introduction. As one of the most played games worldwide, it attracted thousands of passionate developers, who have modded pretty much every aspect of the game itself. Right now, Minecraft offers several ways to alter its gameplay, such as:
- Command blocks: these special blocks can be used in Creative Mode, and allow server operators to create custom events and rules using a series of Minecraft commands. Command blocks, however, are rather limited in what they can alter on their own.
- Data packs: these packages wrap multiple commands into functions (referred to as mcfunctions), and do not require players to build their own command block structures to customise the gameplay. They are the most accessible way to mod Minecraft.
- Resource packs: these packages provide replacements for existing assets (textures, models, sound files, …), and can even add new ones for new items added by data packs and plugins.
While these three options are great for veteran players, they cannot fundamentally alter the game beyond what is allowed by the Minecraft commands. To go deeper, we need plugins. Unfortunately, Minecraft does not natively support plugin development. And while there are developers who have worked around that, creating proper plugins requires a different strategy.
Over the years, a large number of alternative Minecraft servers and clients have been developed. They aim to provide what Minecraft lacked: high performance, more customisation, and support for modding.
While this is great, the Minecraft ecosystem counts dozens of different servers, clients and launchers; most of which developed semi-independently from one another, with the effect that certain plugins are only available for or supported on certain specific versions. In this ecosystem, the words plugin and mod are used to indicate different things:
- Plugins: these packages are typically installed on a Minecraft server, and provide changes and additions to the original gameplay. Players can still login onto a Minecraft server which uses plugins, without the need to install or alter their client. When plugins need extra assets to work, the server typically sends them over to the players.
- Mods: these packages bring radical changes to the gameplay, up to the point that some mods are incompatible with the original Minecraft clients. When that happens, only modded clients can connect to a modded server.
It should be clear by now that there are two separate lines of products:
- Modified servers: which are designed primarily for plugin development, and typically remain compatible with the vanilla Minecraft client. Examples of modified servers are Spigot and Paper.
- Modified clients: which support game-altering mods and are typically only compatible with modified mods. Examples of modified clients are Forge and Fabric.
| Version Name | Plugins? | Mods? | Description |
|---|---|---|---|
| Vanilla | ❌ | ❌ | The original Minecraft server. |
| ✔️ | ❌ | The first Modified Minecraft server. The original project was partially shut down due to copyright claims from Mojang. CraftBukkit is outdated and rarely used these days. | |
| Spigot | ✔️ | ❌ | A fork of CraftBukkit, which circumvented its legal issues. |
| PaperMC/Paper | ✔️ | ❌ | A fork of Spigot. Paper (previously known as PaperMC) is currently one of the most popular and reliable Minecraft servers available. Spigot plugins are generally supported by Paper. |
| Purpur | ✔️ | ❌ | A fork of Tuinity (a less popular server, which was itself a fork of Paper). |
| Pufferfish | ✔️ | ❌ | A fork of Paper, optimised for large servers. |
| Forge | ❌ | ✔️ | A server type that allows for mods, but no plugins. |
| SpongeForge | ❌ | ✔️ | A mod that heavily optimises Forge. |
| Fabric | ✔️ | ✔️ | A lightweight mod and plugin loader |
If you feel all of these versions and forks are very confusion, you’re not alone! This graph shows how complex the current ecosystem has become.
When to use Plugins over Data Packs?
Without a solid understanding of how Minecraft works, it might be difficult to understand when is best to create a data pack versus a plugin.
Data packs are typically compatible with all versions of Minecraft, as they are essentially a collection of commands wrapped into functions. They can even customise aspects of the games, such as adding new items and recipes. These aspects have been discussed at length in the series titled An Introduction to Minecraft Modding, which covers both data and resource packs.
There is one aspect that data packs cannot unfortunately do: give NBT tags to newly crafted items. While it is possible to add recipes using data packs, the items that can be crafted with them cannot have custom NBT tags. They contain the metadata needed to differentiate items, such as enchantments and durability. NBT tags play an essential role in data packs, as they are usually the default way to create new items from existing ones. In Minecraft Modding: Laser Gun, for example, we created a laser gun out of a carrot on a stick. This hack is necessary as an un-modded Minecraft client won’t be able to spawn items different from the ones present in vanilla. The best a data pack can do is to instantiate an existing item, giving it a custom NBT tag, and a custom texture using a resource pack (via the Custom Model Data tag). The item will look different, and the data pack can detect its activation thanks to the custom NBT tags.
But since data packs cannot add recipes that give custom NBT tags, these new items cannot be traditionally crafted in-game. Many data packs use a workaround: throwing the ingredients on the ground to craft a new custom item. Personally, I find this rather hack-y, which is why I started learning about plugin development in the first place.
Plugin Anatomy
In this tutorial, we will focus on the development of a Minecraft plugin compatible with Paper servers, using the Bukkit API. This means that our plugin will likely be compatible with both CraftBukkit, Spigot and Paper.
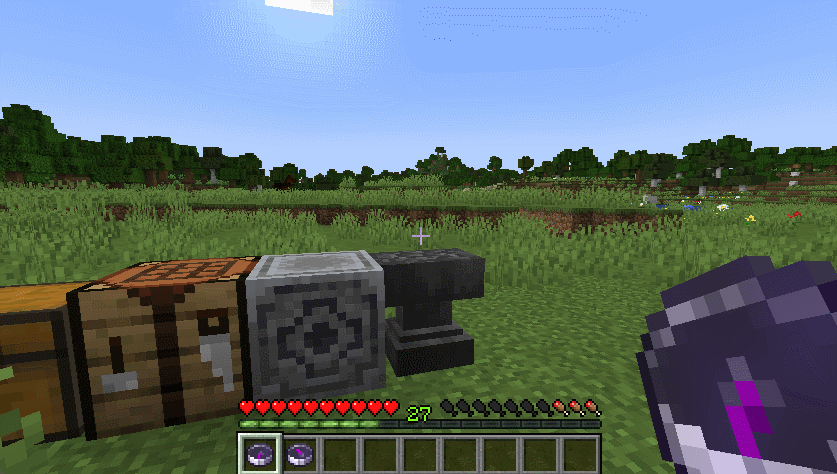
As an example, we will create a plugin called telecompass that allows players to teleport. From the player’s perspective, this is what they will experience:
- Custom recipe: players will be able to craft a telecompass by using existing in-game items.
- Custom texture: the telecompass will have its own texture, and appear with a slightly modified compass.
- Lodestone linking: players will be able to link a telecompass to a lodestone, in the same way they can already do that with a standard compass.
- Teleporting: players will be able to teleport to the position of the linked lodestone when using the telecompass.
From the developer’s perspective, what we have to do is:
- Custom recipe with NBT tags and CMD ID: Adding a custom recipe to the list of recipes available in-game, to create a custom Minecraft compass. The compass will be given a special NBT tag (so that it can be differentiated from all other standard compasses for gameplay purposes), and Custom Model Data ID (so that a resource pack can later change its texture). The recipe will be added when the plugin is loaded, in a method called
onEnable. - Resource pack: Creating a resource pack to replace the textures of compasses with the appropriate Custom Model Data ID.
- Detecting telecompass uses: Intercepting all player interactions, filtering out the ones which are related to telecompasses. This can be done using a method called
onPlayerInteract.- If the interaction is targeting a lodestone block, the standard behaviour of the compass is triggered, and nothing is needed on our side.
- If the interaction is not targeting a block, the player is teleported to the position of the lodestone (which is normally stored inside each compass).
This tutorial will also include a few extra features, such as managing player permissions and spawning particles.
Getting Started
As previously explained, the original (vanilla) Minecraft server does not allow for plugins. While there are definitely ways to hack it, the most reasonable solution is to use one of the many alternative server versions that have been developed over the years. For this tutorial, we will focus on how to create a Minecraft plugin for a Paper server, using the Bukkit API. Such plugins will, within reason, likely be compatible with CraftBukkit, Spigot and Paper as they are all forks of the same project.
The official Paper website contains a detailed tutorial on how to get started with plugin development. In there, they suggest using IntelliJ IDEA as the default IDE. Other IDEs that can target Java can be used (such as Eclipse), but the best aspect of IntelliJ is that it comes with an extension which facilitates the development of Minecraft plugins.
Setting Up the Environment
Assuming Java is already installed, in order to set up the development environment we will need the following steps:
- Installing IntelliJ IDEA
- Installing the Minecraft Development Plugin (which can be done directly from IntelliJ)
- Creating a new project targeting Paper
Some versions of IntelliJ IDEA (such as the Ultimate) are not free, but there are two free license options which can be useful: one for students and educators, and one for open source developers. For more experienced developers, IntelliJ IDEA Community Edition is also free and open-source.
Once IntelliJ IDEA is installed and activated, it is possible to install the Minecraft Development Plugin by going in File > Settings Plugins, then selecting Plugins from the side menu, and Marketplace from the top.

Once installed, you should be able to create a new project by clicking on File > New > Project... and selecting Minecraft from the list:

You are free to select whichever configuration works best for you, but for this tutorial we will focus on the following:
- Platform Type: Plugin
- Platform: Bukkit
- Bukkit Platform: Paper
- Built System: Gradle
Under Build System Properties you should also indicate the name of your plugin class, alongside its package. Java packages are often associated to websites, to ensure their uniqueness among developers; for instance, since my website is www.alanzucconi.com, my Group ID will be com.alanzucconi, and the Artifact ID will be telecompass. The resulting package for my Java files will then be com.alanzucconi.telecompass.
Under Plugin Name I used Telecompass, meaning that my main Java class will be com.alanzucconi.telecompass.Telecompass.
If you do not have a domain, a common suggestion is to use me.yourname; if your project is uploaded on GitHub, you could also use io.github.yourname.
Building Your Plugin
IntelliJ IDEA makes very easy to build your plugin. The project created by the Minecraft Development plugin comes with several fully configured gradle tasks. In case you are unfamiliar, gradle is an automation tool which can be used to run several different tasks related to compilation and production. The tasks we are interested is Tasks/build/build, which will compile the project into a a jar file. Jar is the extension used by Java for its packaged libraries; jar files are effectively zip files which contains Java classes alongside other configuration files needed for the plugin.

Once executed, the resulting jar file should be in the build/lib subfolder. Unless otherwise changed, the library name should look like telecompass-1.0-SNAPSHOT.jar. The jar is shipped with the files contain under the src/main/resource folder. Typically this contains two files:
- plugin.yml: A file used to indicate the name, version and main Java class used by the plugin. This is also where any player permission needs to be specified.
- config.yml: an optional file which you can create to store some configuration. The Paper server will create a folder with the name of your plugin inside the server
pluginfolder, where this file will be copied.
Once the plugin has been successfully built, the next step is to test it.
Testing Your Plugin
There are several ways to test your plugin. While it is possible to configure IntelliJ and gradle so that the compilation process also runs an instance of the server, it is easier to just do this manually. This requires the following steps:
- Setting up the server (first time only):
- Download the jar file for the latest Paper server. This can be done here.
- Run the jar in its own folder, using the following command:
java -jar server.jar, whereserver.jaris the name of the Paper server file. - The server will terminate abruptly the first time: this is intended. Open the newly created
eula.txtfile and accept the conditions; you can now run the server again. If everything runs correctly, the server is now running on your computer. - Open a new instance of the Minecraft client, ensuring your version is matching the Paper server.
- Join a new multiplayer game by using
localhostas the server address. As long as your firewall is not stopping Minecraft’s default port (25565) you should be able to log in to the server.
- Testing the plugin (every time the plugin is recompiled):
- Take the jar file produced by IntelliJ IDEA from the
build/libsubfolder of your project, and copy it into thepluginssubfolder of your Paper server. - If the server is running, type
reload confirm; this should reload all plugins without stopping the server. Depending on how complex your plugins are, you might need to do a full server restart. - Join the server using your Minecraft client to test the plugin
- Take the jar file produced by IntelliJ IDEA from the
These steps might look a bit tedious, but once the setup is running, it is just a matter of copying a file and invoking the reload command on the server.
Developing Your Plugin
All Bukkit plugins need a class that extends JavaPlugin. The two main methods to rely on are onEnable and onDisable, which are called when the plugin is (re)loaded, and when the server shuts down, respectively.
public final class Telecompass extends JavaPlugin
{
    public Logger logger = getLogger();

    @Override
    public void onEnable()
    {
        logger.info("onEnable");
    }

    @Override
    public void onDisable()
    {
        logger.info("onDisable");
    }
}
The snippet above also shows how to retrieve the standard logger, which is used to print messages in the server console. These messages are not visible to the players, but can be invaluable when debugging a plugin. Make sure to keep them to a minimum once your plugin is released, to avoid polluting the server logs.
Adding a Recipe
Minecraft supports two types of recipes: shapeless recipes and shaped recipes. The former can take items in whichever order, while the latter requires them to be placed in a specific arrangement on the crafting grid.
The way in which the Bukkit API specify shaped recipes is by providing three strings of three characters each. Each string represents the items needed for the crafting; for instance, the recipe above can be described using "ESE", "ECE" and "EEE". These letters can be bound to specific items via code. For the telecompass, the recipe includes one compass, seven ender pearls, and one echo shards.

The recipe also needed two extra inputs: a namespace key and an item stack. The former represents the unique ID of this recipe, which in this case will be "telecompass:telecompass" (an item called "telecompass", from the "telecompass" plugin). The latter represents the result of the recipe; in most cases this is a single item, but there might be situations in which multiple items are returned (for instance, one block of kelp can be converted into nine dried kelps). For this reason, the recipe takes an object of type ItemStack. It is worth noticing, in fact, that in Minecraft the amount of an item is a property of the item itself; when you hold 16 eggs in one slot, you do not have 16 items: you have one egg, which an NBT tag called "Count" with value 16.
The following snippet shows how to add a shaped recipe to Minecraft, instantiating a telecompass and also setting up its name, NBT tag and CMD ID:
public final class Telecompass extends JavaPlugin
{
    public NamespacedKey telecompassKey =  new NamespacedKey(this, "telecompass");
    public static final int telecompassCMD = 1; // Custom model data (just made this up!)

    @Override
    public void onEnable()
    {
        // Creates the item
        ItemStack item = new ItemStack(Material.COMPASS);
        ItemMeta meta = item.getItemMeta();

        meta.displayName (Component.text("Telecompass", NamedTextColor.LIGHT_PURPLE));         // Display name

        meta.getPersistentDataContainer().set(telecompassKey, PersistentDataType.BOOLEAN, true); // NBT tag
        meta.setCustomModelData(telecompassCMD); // Custom Model Data

        item.setItemMeta(meta);

        // Recipe
        ShapedRecipe recipe = new ShapedRecipe(telecompassKey, item);

        recipe.shape("ESE", "ECE", "EEE");
        recipe.setIngredient('E', Material.ENDER_PEARL);
        recipe.setIngredient('S', Material.ECHO_SHARD);
        recipe.setIngredient('C', Material.COMPASS);

        Bukkit.addRecipe(recipe);
    }
The NBT tag will be used in the plugin code to distinguish between traditional compasses and telecompasses. The Custom Model Data ID will be used by the resource pack to change the texture. It is worth noticing that, for all purposes, telecompasses are compasses. Because we are creating a plugin, we do not have the ability to create truly new objects; that is something only mods can do, as they would need to also update the Minecraft client.
❓ What is a Persistent Data Container?In the snippet above, you might have noticed a call to a specific function, meta.getPersistentDataContainer(), which appears to be referencing something known as a persistent data container. This is a concept specific to Paper, rather than Minecraft itself, and is described in details in the official documentation: Persistent Data Container (PDC).
When you need to store data inside an object, this is usually done through two ways: NBT tags, and lore or display name. Both strategies come with their own issue; deciding if an object is a telecompass purely based on its name, for instance, can lead to unexpected behaviours if items are named in an anvil. And with NBT tags, there is a risk of collisions between multiple plugins.
For this reason, Paper introduces persistent data containers. From the developers’ perspective, PDCs are just APIs to store and retrieve arbitrary data inside Minecraft items. At the lower level, PDCs are indeed implemented through NBT tags, but in a way that guarantees no collision between plugins. This is because each key stored needs its own NamespaceKey; by design, a namespace key starts with the name of the plugin in which it is defined.
It is possible to view the PDC stored inside the item the player is holding by typing the following command: /data get entity @s SelectedItem. In the case of a telecompass, this reveals that the PDCs are indeed stored using NBT tags, inside the dictionary called PublicBukkitValues.
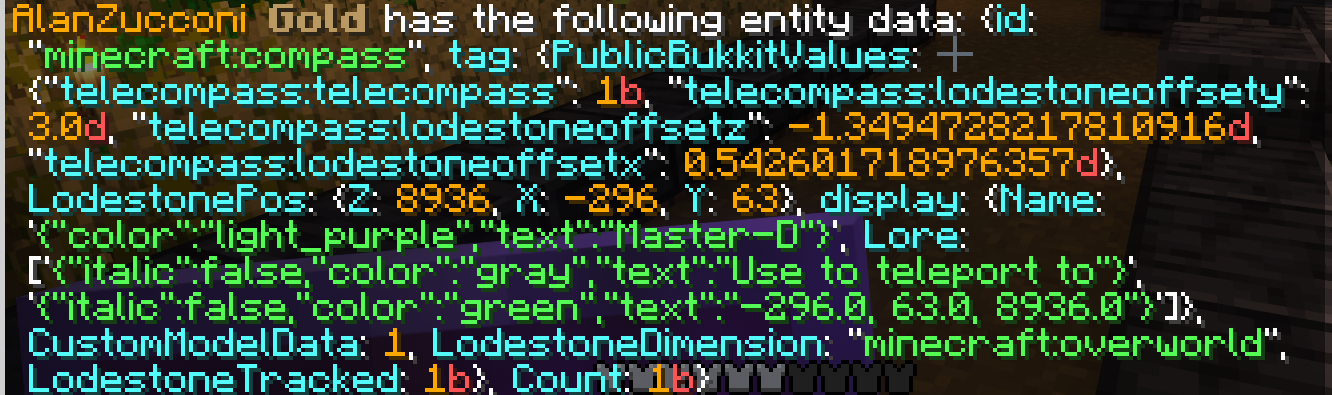
In the image above you can see that the NBT tags also store the item name, lore and even the quantity in their inventory slot.
Intercepting Interaction Events
What makes plugins really powerful, is their ability to intercept (and potentially change) in-game events. The Bukkit API provides ways to listen to most events happening in games, such as players joining the server and interacting with the various items.
Once used, the telecompass will teleport the player to the position of the lodestone it is linked to. The easiest way to do this in a Paper plugin is to intercept the onPlayerInteract event, which is invoked every time a player is interacting with an item, block, or entity.
The Java class needs to do the following:
- Implementing the
Listenerinterface - Providing a method with the following signature:
@EventHandler public void onPlayerInteract(PlayerInteractEvent event) - Registering the class as an event listener in the plugin manager using the
registerEventmethod
The following snippet shows how to that, and how to retrieve the necessary information from the PlayerInteractEvent object:
public final class Telecompass extends JavaPlugin implements Listener
{
    // ...

    @Override
    public void onEnable()
    {
        // ...

        // Register this class as an event listener
        Bukkit.getPluginManager().registerEvents(this, this);
    }

    // Intercepts players interactions
    @EventHandler
    public void onPlayerInteract(PlayerInteractEvent event)
    {
        Player player = event.getPlayer(); // The player who initiated the interaction
        Action action = event.getAction(); // The action performed
        Block  block  = event.getBlock (); // The block the player interacted with (or null if there isn't one)

        // ...
    }
}
We now have everything we need to properly implement the main functionality of the telecompass plugin. There are two parts to this:
- Detecting the right type of event (the player right-clicking while holding a telecompass)
- Detecting if the player is right-clicking on a lodestone
- Detecting if the player is not right-clicking onto anything (in which case, teleport it)
    @EventHandler(priority = EventPriority.HIGHEST)
    public void onPlayerInteract(PlayerInteractEvent event)
    {
        // [1] -------------------------
        // Must be a right click
        if(! event.getAction().isRightClick())
            return;


        // [2] -------------------------
        // Player must be holding a telecompass in their main hand

        // Retrieves item in hand
        Player player = event.getPlayer();
        ItemStack item = player.getInventory().getItemInMainHand();

        // The player must be holding a compass
        if (item.getType() != Material.COMPASS)
            return;

        // Retrieves metadata
        ItemMeta meta = item.getItemMeta();
        // No meta: it cannot be a telecompass
        if (meta == null)
            return;

        // It is not a telecompass
        if (! meta.getPersistentDataContainer().has(telecompassKey, PersistentDataType.BOOLEAN))
            return;


        // [3] -------------------------
        // Is the player right-clicking on a lodestone?
        // If so, we don't teleport and let the compass link to it!

        // Check if the player right-clicked on a lodestone
        if (    event.getClickedBlock() != null &&
                event.getClickedBlock().getType() == Material.LODESTONE
        )
        {
            // We don't do anything:
            // This will force the "default" behaviour of the compass,
            // which will be linked to this lodestone
            return;
        }


        // [4] -------------------------
        // Teleports the player to the lodestone position
        // (providing that the telecompass was linked to a lodestone)

        // Retrieves the lodestone location from the telecompass
        CompassMeta compassMeta = (CompassMeta) meta;
        Location lodestoneLocation = compassMeta.getLodestone();

        // No location set
        if (lodestoneLocation == null)
            return;

        // Teleports
        player.teleport(newLocation);
    }
To get a very basic telecompass running, that is honestly all the code we need! The “full” version created for this tutorial has many more features, including player permissions, teleport cooldowns, and the ability to teleport only when interacting on air or on other blocks that do not support an existing interaction (such as chests, furnaces, etc).
📚 Event priorityMultiple plugins are likely to listen to the same event. Sometimes this can create problems, especially when a clear order or execution must be respected. The Bukkit API provides a way to indicate how important/critical an event listener is, through six priority levels:
EventPriority.MONITOREventPriority.HIGHESTEventPriority.HIGHEventPriority.NORMALEventPriority.LOWEventPriority.LOWEST
The event handlers with the lowest priorities are called first, and the ones with the highest are called last. This might sound counter-intuitive, because it is easy to imagine that something with a high-priority should take place before something with a lower priority. To understand why that is not the case, we need to understand how events are called in Bukkit.
When the player wants to interact with an item, the event listeners are notified before the action itself is executed. Each event handler has the chance to review and, potentially, alter or even cancel the interaction altogether. The last event handler to be called has the highest priority, in the sense that it has the final say on what the outcome of the interaction should be. This means that the changes made by a prior event handler might be overridden entirely.
Event handlers on the MONITOR priority are called for last, and by contract they cannot alter the event, just monitor it.
You can read more about the @EventHandler class annotation here.
Some event handlers might decide to cancel the event altogether. For instance, let’s imagine for some reason we want to stop the player from re-linking their telecompass to another lodestone. Since the telecompass is, by all means, an actual Minecraft compass, the game will automatically link it to a lodestone every time the player interacts with it. By listening for such an event and cancelling it, we are stopping Minecraft from executing its part of the interaction. As a result, the player will not be able to re-link the lodestone again.
An event can be cancelled by invoking event.setCancelled(true).
Resource Pack
By default, all telecompasses will look like traditional compasses. This is because all telecompasses are indeed traditional compasses. In order to give them a different texture, we need to rely on resource packs. The topic has been covered extensively in a previous article, Minecraft Modding: Laser Gun, where they were used to replace the texture of a carrot on a stick item with the one of a laser gun.
The situation here is a bit more difficult, as the compass is actually made of a lot of different textures. Consequently, the setup to replace them all is a bit more complicated.
The Default Resource Pack from Mojang
When we want to replace the texture of an existing item, a good starting point is to search for the original assets used by Minecraft. This is important because resource packs contain much more than textures: they pack also the metadata necessary to link them to their respective in-game items.
Websites such as MC Assets keep archives of the default resource packs shipped with all versions of Minecraft. To get started, we can download the one for our target version (1.20 in this case) and extract the original assets related to the compass. The folder structure will probably look like this:
- 📁 (root folder)
- 📁 assets
- 📁 minecraft
- 📁 models
- 📁 item
- 📄 compass.json (#1 indicates which model to use based on the needle orientation, references
compass_xx.json) - 📄 compass_00.json (#2 indicates which texture to use for the given need orientation, references
compass_xx.png) - 📄 …
- 📄 compass_31.json
- 📄 compass.json (#1 indicates which model to use based on the needle orientation, references
- 📁 item
- 📁 textures
- 📁 item
- 🖼️ compass_00.png (#3 the textures to use)
- 🖼️ …
- 🖼️ compass_31.png
- 📁 item
- 📁 models
- 📁 minecraft
- 📁 assets
The original resource pack from Mojang works in three steps:
- A file
compass.jsonindicates which models need to be used for the compass. In this case, the file indicates that different models have to be used depending on the needle orientation. Those models are defined in thecompass_xx.jsonfiles:
{
    "parent": "item/generated",
    "textures": {
        "layer0": "item/compass_16"
    },
    "overrides": [
        { "predicate": { "angle": 0.000000 }, "model": "item/compass" },
        { "predicate": { "angle": 0.015625 }, "model": "item/compass_17" },
        { "predicate": { "angle": 0.046875 }, "model": "item/compass_18" },
        { "predicate": { "angle": 0.078125 }, "model": "item/compass_19" },
        { "predicate": { "angle": 0.109375 }, "model": "item/compass_20" },
        { "predicate": { "angle": 0.140625 }, "model": "item/compass_21" },
        { "predicate": { "angle": 0.171875 }, "model": "item/compass_22" },
        { "predicate": { "angle": 0.203125 }, "model": "item/compass_23" },
        { "predicate": { "angle": 0.234375 }, "model": "item/compass_24" },
        { "predicate": { "angle": 0.265625 }, "model": "item/compass_25" },
        { "predicate": { "angle": 0.296875 }, "model": "item/compass_26" },
        { "predicate": { "angle": 0.328125 }, "model": "item/compass_27" },
        { "predicate": { "angle": 0.359375 }, "model": "item/compass_28" },
        { "predicate": { "angle": 0.390625 }, "model": "item/compass_29" },
        { "predicate": { "angle": 0.421875 }, "model": "item/compass_30" },
        { "predicate": { "angle": 0.453125 }, "model": "item/compass_31" },
        { "predicate": { "angle": 0.484375 }, "model": "item/compass_00" },
        { "predicate": { "angle": 0.515625 }, "model": "item/compass_01" },
        { "predicate": { "angle": 0.546875 }, "model": "item/compass_02" },
        { "predicate": { "angle": 0.578125 }, "model": "item/compass_03" },
        { "predicate": { "angle": 0.609375 }, "model": "item/compass_04" },
        { "predicate": { "angle": 0.640625 }, "model": "item/compass_05" },
        { "predicate": { "angle": 0.671875 }, "model": "item/compass_06" },
        { "predicate": { "angle": 0.703125 }, "model": "item/compass_07" },
        { "predicate": { "angle": 0.734375 }, "model": "item/compass_08" },
        { "predicate": { "angle": 0.765625 }, "model": "item/compass_09" },
        { "predicate": { "angle": 0.796875 }, "model": "item/compass_10" },
        { "predicate": { "angle": 0.828125 }, "model": "item/compass_11" },
        { "predicate": { "angle": 0.859375 }, "model": "item/compass_12" },
        { "predicate": { "angle": 0.890625 }, "model": "item/compass_13" },
        { "predicate": { "angle": 0.921875 }, "model": "item/compass_14" },
        { "predicate": { "angle": 0.953125 }, "model": "item/compass_15" },
        { "predicate": { "angle": 0.984375 }, "model": "item/compass" }
    ]
}
- A series of 32
compass_xx.json(from 00 to 31) are used to indicate which texture to use for each needle orientation. Those model files are directly referencing their respectivecompass_xx.pngtextures. This is whatcompass_00.jsonlooks like (layer0refers to the main texture file used for the item):
{
  "parent": "minecraft:item/generated",
  "textures": {
    "layer0": "minecraft:item/compass_00"
  }
}
- A series of 32
compass_xx.pngtextures to be used for the compasses.
If all you need is to replace the texture for all compasses, all that is needed is to provide a folder with the different compass_xx.png files. Resource packs, in fact, are overriding the existing files provided by Mojang. Our case, however, is different: we do not want to replace all compasses, but only the ones that are recognised as telecompasses.
Using Custom Model Data
Resource packs allow to differentiate the compass textures we want to replace using the Custom Model Data field initialised when creating the item. Because we want to change the default behaviour of compasses, we do need to override the default compass.json file to include references to the Custom Model Data of telecompasses. The resulting file, assets/minecraft/models/item/compass.json, will look like this:
{
    "parent": "item/generated",
    "textures": {
        "layer0": "item/compass_16"
    },
    "overrides": [
        { "predicate": { "angle": 0.000000 }, "model": "item/compass" },
        { "predicate": { "angle": 0.015625 }, "model": "item/compass_17" },
        { "predicate": { "angle": 0.046875 }, "model": "item/compass_18" },
        { "predicate": { "angle": 0.078125 }, "model": "item/compass_19" },
        { "predicate": { "angle": 0.109375 }, "model": "item/compass_20" },
        { "predicate": { "angle": 0.140625 }, "model": "item/compass_21" },
        { "predicate": { "angle": 0.171875 }, "model": "item/compass_22" },
        { "predicate": { "angle": 0.203125 }, "model": "item/compass_23" },
        { "predicate": { "angle": 0.234375 }, "model": "item/compass_24" },
        { "predicate": { "angle": 0.265625 }, "model": "item/compass_25" },
        { "predicate": { "angle": 0.296875 }, "model": "item/compass_26" },
        { "predicate": { "angle": 0.328125 }, "model": "item/compass_27" },
        { "predicate": { "angle": 0.359375 }, "model": "item/compass_28" },
        { "predicate": { "angle": 0.390625 }, "model": "item/compass_29" },
        { "predicate": { "angle": 0.421875 }, "model": "item/compass_30" },
        { "predicate": { "angle": 0.453125 }, "model": "item/compass_31" },
        { "predicate": { "angle": 0.484375 }, "model": "item/compass_00" },
        { "predicate": { "angle": 0.515625 }, "model": "item/compass_01" },
        { "predicate": { "angle": 0.546875 }, "model": "item/compass_02" },
        { "predicate": { "angle": 0.578125 }, "model": "item/compass_03" },
        { "predicate": { "angle": 0.609375 }, "model": "item/compass_04" },
        { "predicate": { "angle": 0.640625 }, "model": "item/compass_05" },
        { "predicate": { "angle": 0.671875 }, "model": "item/compass_06" },
        { "predicate": { "angle": 0.703125 }, "model": "item/compass_07" },
        { "predicate": { "angle": 0.734375 }, "model": "item/compass_08" },
        { "predicate": { "angle": 0.765625 }, "model": "item/compass_09" },
        { "predicate": { "angle": 0.796875 }, "model": "item/compass_10" },
        { "predicate": { "angle": 0.828125 }, "model": "item/compass_11" },
        { "predicate": { "angle": 0.859375 }, "model": "item/compass_12" },
        { "predicate": { "angle": 0.890625 }, "model": "item/compass_13" },
        { "predicate": { "angle": 0.921875 }, "model": "item/compass_14" },
        { "predicate": { "angle": 0.953125 }, "model": "item/compass_15" },
        { "predicate": { "angle": 0.984375 }, "model": "item/compass" },

        { "predicate": { "angle": 0.000000, "custom_model_data":1 }, "model": "telecompass:item/telecompass" },
        { "predicate": { "angle": 0.015625, "custom_model_data":1 }, "model": "telecompass:item/telecompass_17" },
        { "predicate": { "angle": 0.046875, "custom_model_data":1 }, "model": "telecompass:item/telecompass_18" },
        { "predicate": { "angle": 0.078125, "custom_model_data":1 }, "model": "telecompass:item/telecompass_19" },
        { "predicate": { "angle": 0.109375, "custom_model_data":1 }, "model": "telecompass:item/telecompass_20" },
        { "predicate": { "angle": 0.140625, "custom_model_data":1 }, "model": "telecompass:item/telecompass_21" },
        { "predicate": { "angle": 0.171875, "custom_model_data":1 }, "model": "telecompass:item/telecompass_22" },
        { "predicate": { "angle": 0.203125, "custom_model_data":1 }, "model": "telecompass:item/telecompass_23" },
        { "predicate": { "angle": 0.234375, "custom_model_data":1 }, "model": "telecompass:item/telecompass_24" },
        { "predicate": { "angle": 0.265625, "custom_model_data":1 }, "model": "telecompass:item/telecompass_25" },
        { "predicate": { "angle": 0.296875, "custom_model_data":1 }, "model": "telecompass:item/telecompass_26" },
        { "predicate": { "angle": 0.328125, "custom_model_data":1 }, "model": "telecompass:item/telecompass_27" },
        { "predicate": { "angle": 0.359375, "custom_model_data":1 }, "model": "telecompass:item/telecompass_28" },
        { "predicate": { "angle": 0.390625, "custom_model_data":1 }, "model": "telecompass:item/telecompass_29" },
        { "predicate": { "angle": 0.421875, "custom_model_data":1 }, "model": "telecompass:item/telecompass_30" },
        { "predicate": { "angle": 0.453125, "custom_model_data":1 }, "model": "telecompass:item/telecompass_31" },
        { "predicate": { "angle": 0.484375, "custom_model_data":1 }, "model": "telecompass:item/telecompass_00" },
        { "predicate": { "angle": 0.515625, "custom_model_data":1 }, "model": "telecompass:item/telecompass_01" },
        { "predicate": { "angle": 0.546875, "custom_model_data":1 }, "model": "telecompass:item/telecompass_02" },
        { "predicate": { "angle": 0.578125, "custom_model_data":1 }, "model": "telecompass:item/telecompass_03" },
        { "predicate": { "angle": 0.609375, "custom_model_data":1 }, "model": "telecompass:item/telecompass_04" },
        { "predicate": { "angle": 0.640625, "custom_model_data":1 }, "model": "telecompass:item/telecompass_05" },
        { "predicate": { "angle": 0.671875, "custom_model_data":1 }, "model": "telecompass:item/telecompass_06" },
        { "predicate": { "angle": 0.703125, "custom_model_data":1 }, "model": "telecompass:item/telecompass_07" },
        { "predicate": { "angle": 0.734375, "custom_model_data":1 }, "model": "telecompass:item/telecompass_08" },
        { "predicate": { "angle": 0.765625, "custom_model_data":1 }, "model": "telecompass:item/telecompass_09" },
        { "predicate": { "angle": 0.796875, "custom_model_data":1 }, "model": "telecompass:item/telecompass_10" },
        { "predicate": { "angle": 0.828125, "custom_model_data":1 }, "model": "telecompass:item/telecompass_11" },
        { "predicate": { "angle": 0.859375, "custom_model_data":1 }, "model": "telecompass:item/telecompass_12" },
        { "predicate": { "angle": 0.890625, "custom_model_data":1 }, "model": "telecompass:item/telecompass_13" },
        { "predicate": { "angle": 0.921875, "custom_model_data":1 }, "model": "telecompass:item/telecompass_14" },
        { "predicate": { "angle": 0.953125, "custom_model_data":1 }, "model": "telecompass:item/telecompass_15" },
        { "predicate": { "angle": 0.984375, "custom_model_data":1 }, "model": "telecompass:item/telecompass" }
    ]
}
It is easy to see how the first part has remained unchanged. This is very important, because without it the original compasses simply won’t work; we do need to preserve the original predicates for them to remain operational. It is also important to notice that any new statement needs to be executed after the original ones; if not, all compasses will simply look like telecompasses. It appears, in fact, that predicates are executed in order; if multiple predicates are matching, Minecraft will pick the last one matching.
The current setup will look like this:
- 📁 Telecompass
- 📄 pack.mcmeta
- 🖼️ pack.png
- 📁 assets
- 📁 minecraft
- 📁 models
- 📁 item
- 📄 compass.json (#1 overrides the default Minecraft compass, references
telecompass.jsonandtelecompass_xx.json)
- 📄 compass.json (#1 overrides the default Minecraft compass, references
- 📁 item
- 📁 models
- 📁 telecompass
- 📁 models
- 📁 item
- 📄 telecompass.json (#2 indicates what textures to use, references
telecompass_xx.png) - 📄 telecompass_00.json
- 📄 …
- 📄 telecompass_31.json
- 📄 telecompass.json (#2 indicates what textures to use, references
- 📁 item
- 📁 textures
- 📁 item
- 🖼️ telecompass_00.png (#3 the textures to use)
- 🖼️ …
- 🖼️ telecompass_31.png
- 📁 item
- 📁 models
- 📁 minecraft
We do not need to include neither the original compass_xx.json model files, nor the original compass_xx.png textures, as we are not changing the models/textures for the original compasses. We do need, however, to include the various telecompass_xx.json model files, as they are needed to indicate which textures have to be used.
The minecraft/models/item/compass.json looks like this, strongly mirrors its original counterpart:
{
    "parent": "item/generated",
    "textures": {
        "layer0": "telecompass:item/telecompass_16"
    },
    "overrides": [
        { "predicate": { "angle": 0.000000, "custom_model_data":1 }, "model": "telecompass:item/telecompass" },
        { "predicate": { "angle": 0.015625, "custom_model_data":1 }, "model": "telecompass:item/telecompass_17" },
        { "predicate": { "angle": 0.046875, "custom_model_data":1 }, "model": "telecompass:item/telecompass_18" },
        { "predicate": { "angle": 0.078125, "custom_model_data":1 }, "model": "telecompass:item/telecompass_19" },
        { "predicate": { "angle": 0.109375, "custom_model_data":1 }, "model": "telecompass:item/telecompass_20" },
        { "predicate": { "angle": 0.140625, "custom_model_data":1 }, "model": "telecompass:item/telecompass_21" },
        { "predicate": { "angle": 0.171875, "custom_model_data":1 }, "model": "telecompass:item/telecompass_22" },
        { "predicate": { "angle": 0.203125, "custom_model_data":1 }, "model": "telecompass:item/telecompass_23" },
        { "predicate": { "angle": 0.234375, "custom_model_data":1 }, "model": "telecompass:item/telecompass_24" },
        { "predicate": { "angle": 0.265625, "custom_model_data":1 }, "model": "telecompass:item/telecompass_25" },
        { "predicate": { "angle": 0.296875, "custom_model_data":1 }, "model": "telecompass:item/telecompass_26" },
        { "predicate": { "angle": 0.328125, "custom_model_data":1 }, "model": "telecompass:item/telecompass_27" },
        { "predicate": { "angle": 0.359375, "custom_model_data":1 }, "model": "telecompass:item/telecompass_28" },
        { "predicate": { "angle": 0.390625, "custom_model_data":1 }, "model": "telecompass:item/telecompass_29" },
        { "predicate": { "angle": 0.421875, "custom_model_data":1 }, "model": "telecompass:item/telecompass_30" },
        { "predicate": { "angle": 0.453125, "custom_model_data":1 }, "model": "telecompass:item/telecompass_31" },
        { "predicate": { "angle": 0.484375, "custom_model_data":1 }, "model": "telecompass:item/telecompass_00" },
        { "predicate": { "angle": 0.515625, "custom_model_data":1 }, "model": "telecompass:item/telecompass_01" },
        { "predicate": { "angle": 0.546875, "custom_model_data":1 }, "model": "telecompass:item/telecompass_02" },
        { "predicate": { "angle": 0.578125, "custom_model_data":1 }, "model": "telecompass:item/telecompass_03" },
        { "predicate": { "angle": 0.609375, "custom_model_data":1 }, "model": "telecompass:item/telecompass_04" },
        { "predicate": { "angle": 0.640625, "custom_model_data":1 }, "model": "telecompass:item/telecompass_05" },
        { "predicate": { "angle": 0.671875, "custom_model_data":1 }, "model": "telecompass:item/telecompass_06" },
        { "predicate": { "angle": 0.703125, "custom_model_data":1 }, "model": "telecompass:item/telecompass_07" },
        { "predicate": { "angle": 0.734375, "custom_model_data":1 }, "model": "telecompass:item/telecompass_08" },
        { "predicate": { "angle": 0.765625, "custom_model_data":1 }, "model": "telecompass:item/telecompass_09" },
        { "predicate": { "angle": 0.796875, "custom_model_data":1 }, "model": "telecompass:item/telecompass_10" },
        { "predicate": { "angle": 0.828125, "custom_model_data":1 }, "model": "telecompass:item/telecompass_11" },
        { "predicate": { "angle": 0.859375, "custom_model_data":1 }, "model": "telecompass:item/telecompass_12" },
        { "predicate": { "angle": 0.890625, "custom_model_data":1 }, "model": "telecompass:item/telecompass_13" },
        { "predicate": { "angle": 0.921875, "custom_model_data":1 }, "model": "telecompass:item/telecompass_14" },
        { "predicate": { "angle": 0.953125, "custom_model_data":1 }, "model": "telecompass:item/telecompass_15" },
        { "predicate": { "angle": 0.984375, "custom_model_data":1 }, "model": "telecompass:item/telecompass" }
    ]
}
And the assets/telecompass/models/item/telecompass_00.json looks like this:
{
  "parent": "minecraft:item/generated",
  "textures": {
    "layer0": "telecompass:item/telecompass_00"
  }
}
With those files in place, the entire resource pack can be zipped and is ready to be used.
Sending the Resource Pack to the Players
Resource packs are used only by the Minecraft clients; this means all players will need to have it installed on their machines if they want to see the custom textures.
Luckily, the Bukkit API provides an easy way to automatically send a resource pack to all players. This can be done by intercepting the onPlayerJoin event, and triggering the setResourcePack method:
    @EventHandler
    public void onPlayerJoin (PlayerJoinEvent event)
    {
        Player player = event.getPlayer();

        player.setResourcePack(telecompassResourcePackLink, telecompassResourcePackSHA1);
    }
For this to work, you will need a link to the zipped resource pack. They can be uploaded on your Dropbox or OneDrive folder; if you choose to do that, make sure that the link you generate is a direct link, and does not lead to a page where someone needs to click something. On Dropbox, for instance, this can be changing the last part of the URL from &dl=0 to &dl=1.
The setResourcePack method also needs the SHA1 of the resource pack, which is used for security reasons. You can calculate the SHA1 of a file using one of the many online tools such as this one. This is an essential step, and will stop players from downloading the resource pack in case there has been any unwanted change.
It is also worth mentioning that resource packs sent to players in this way are only applied to that specific game session. The pack will be cached on each player’s machine, but it will be unloaded as soon as the player leaves the server.
Additional Features
The current version of the telecompass plugin works, but is rather rough. Minecraft players are used to highly polished plugins, and they expect a lot. This section will review some additional features that can be implemented to improve our plugins.
Particles & Sound Effects
The Bukkit API allows spaning particles. There are two ways to do so: player particles, and world particles. While the APIs for both look identical, the main difference is that in one case the particles are visible to one specific player only, while in the other case they are visible to all players.
In this case, it makes sense to spawn particles for all players. The following piece of code shows how we can the purple particles associated with Ender chests and endermen, as well as playing their typical teleport sound:
        // Spawn particles at original location
        player.getWorld().spawnParticle(Particle.REVERSE_PORTAL, playerLocation, 500, 0.25, 1, 0.25, 0.1);
        player.getWorld().playSound(playerLocation, Sound.ENTITY_ENDERMAN_TELEPORT, 1.0f, 1.0f);

        // Teleports
        player.teleport(newLocation);

        // Spawn particles at target location
        newLocation.getWorld().spawnParticle(Particle.REVERSE_PORTAL, newLocation, 500, 0.25, 1, 0.25, 0.1);
        newLocation.getWorld().playSound(newLocation, Sound.ENTITY_ENDERMAN_TELEPORT, 1.0f, 1.0f);
The numeric parameters represent, in order:
count: the number of particles to spawn;offsetX: how far the particles will travel on the X axis;offsetY: how far the particles will travel on the Y axis;offsetZ: how far the particles will travel on the Z axis;extra: the velocity of the particle.
One thing to keep in mind is that the Bukkit API offers several different overloads for the spawnParticle method. This is because different types of particles require different data to work correctly. Minecraft offers the following types of particles:
- Traditional particles: they are spawned based on a particle type, which indicates their texture, colour and duration;
- Directional particles: they need to know in which direction to move, such as bubble columns, or end rod particles;
- Coloured particles: some selected particles can be given an arbitrary colour (such as dust particles and potion effect particles), while others can only be given a selected range of colours (such as note particles). Finally, Minecraft offers a type of dust particle that can transition between two colours during its lifetime;
- Material particles: these are the particles that appear when a block is broken, or when food is eaten, and they contain pieces of that block’s original texture;
- Vibration particles: they were introduced as part of the sculk block family, and they represent the vibration signals that travel between a noise source and a sculk sensor;
- Sculk particles: they spawn on the face of a cube.
You might have realised by now that the way particles can be spawned in Minecraft is severely limited, compared to other game engines, as they are tied to specific gameplay features. For instance, there is no easy way to spawn a certain number of particles with a given texture and a given colour that move in a specific pattern.
If you are interested in learning more about how to spawn particles in Minecraft, I would highly recommend the Comprehensive Particle Spawning Guide by Esophose.
⌚ Spawning particles in unloaded chunksThe last thing to keep in mind is that particles might not appear if the region in which they are not defined has not been loaded yet. The snippet above, for instance, won’t spawn any particle if the player is teleporting in a region where there are no players around.
One way to get around this would be to wait for the region to be loaded, and then to spawn the particles. There are many ways to do this, although the easier is to schedule a task to run after a certain number of ticks, assuming the chunk would be loaded by then. This can be achieved using the scheduleSyncDelayedTask method, which is part of the BukkitScheduler API:
        BukkitScheduler scheduler = getServer().getScheduler();
        scheduler.scheduleSyncDelayedTask
        (
            this,
            new Runnable()
            {
                @Override
                public void run()
                {
                    // Spawn particles here
                }
            },
            5L // 20 ticks = 1 second
        );
A better alternative, although more complicated, would be to run a repeating task (such as BukkitRunnable.runTaskTimer) to effectively wait for the destination chunk to be loaded:
        new BukkitRunnable()
        {
            @Override
            public void run()
            {
                // The target chunk has not been loaded yet
                Chunk chunk = newLocation.getWorld().getChunkAt(newLocation);
                if (! chunk.isLoaded())
                    return;

                // Spawn the particle here

                // Cancels the repeating task
                this.cancel();
            }
        }.runTaskTimer(this, 0L, 1L); // (plugin, delay, ticks)
The Bukkit API offers several methods to schedule tasks and run code in parallel. Splitting the execution of a method over many different functions can be tricky, and it is strongly linked to the subject of thread safety. If you are interested in reading more about this, you can refer to this article titled Scheduler Programming.
Permissions
One of the most interesting features of Paper servers is the possibility of giving players permissions to invoke certain commands, or to perform certain actions. Bukkit integrates permissions seamlessly, so that all plugins can use the same APIs to access them.
Permissions are defined in the plugin.yml file, which is automatically created by IntelliJ IDEA when a new project is created using the Minecraft Development Plugin. The following snippet shows how to define permissions:
name: Telecompass
version: '${version}'
main: com.alanzucconi.telecompass.Telecompass
api-version: '1.20'
permissions:
  telecompass.craft:
    description: Allows players to craft telecompasses.
    default: false
  telecompass.link:
    description: Allows players to link a telecompass to a lodestone.
    default: false
  telecompass.use:
    description: Allows players to use telecompasses for teleportation.
    default: false
What this does, it creates four new permissions: telecompass.craft, telecompass.link, and telecompass.use. When creating new permissions, it is best to have them start with the name of your plugin to avoid conflicts. This also allows you to grant players all permissions for your plugin by using an expression such as telecompass.*.
It is very easy to test if a player has a permission, using the hasPermission method:
    public boolean canUse(Player player)
    {
        return player.hasPermission("telecompass.use");
    }
The best way to manage permissions on your server is to use an external plugin, such as LuckPerms, which also comes with a handy web interface.
Configuration File
If you are familiar with Minecraft plugins, you might have seen that almost all of them have a configuration file called config.yml, which can be accessed from the plugin/<plugin_name> folder of your Paper server. The reason why virtually all plugins follow the same structure, is because the the Bukkit API provides an easy way to ship, read and write to this file.
Your plugin does not need to have a config.yml file, but if you want to have one, all you need to do is to create one in the resources folder of your IntelliJ IDEA project (the same location of plugin.yml). The following
The following two lines of code are responsible for loading the current config.yml file when the plugin is first enabled; or to create a new one from the ones provided in the resources folder of your project:
    @Override
    public void onEnable()
    {
        getConfig().options().copyDefaults(true);
        saveDefaultConfig();

        ...
    }
The copyDefaults method, in fact, ensures that all missing properties from the current configuration files are inherited from the original template. This is a good way to ensure that all of the default properties retain the default values you have chosen for them.
Reading a property is fairly easy, and the various get– methods also allow to specify a default value in case the required entry is missing. The line below shows how to retrieve a property called cooldown, which default value should be 5 in case it is missing:
long cooldownTime = getConfig().getInt("cooldown", 5);
The BukkitAPI contains several methods that allow it to effectively read from and write to the configuration files. If needed, you can even create new ones.
Action Cooldown
The main purpose of Telecompass is to teleport players to a different location. It makes sense to implement a cooldown period, so that telecompasses cannot be used too often. Unfortunately the Bukkit APIs do not provide a system to do so. A good way to implement a cooldown effect is to use a hashmap to store the timestamps of the last telecompass use for each player.
The following class does exactly that, and you can use it as a template to manage different cooldown periods for different actions:
public class PlayerCooldown
{
    private Map<UUID, Long> timestamps = new HashMap<UUID, Long>(); // Player timestamps
    private long cooldown; // in ticks

    public PlayerCooldown(long cooldownInTicks)
    {
        this.cooldown = cooldownInTicks;
    }

    public void update (Player player)
    {
        timestamps.put(player.getUniqueId(), player.getWorld().getGameTime());
    }

    public boolean expired (Player player)
    {
        UUID id = player.getUniqueId();
        if (! timestamps.containsKey(id))
            return true; // never done before = no need to cooldown

        // Has cooldown elapsed?
        return timestamps.get(id) + cooldown <= player.getWorld().getGameTime();
    }
}
It works by using the unique player ID (UUID) as a key. Never rely on the player name for features like that, as that can be changed or altered!
bStats
All Paper servers have support enabled by default for bStats. This is a plugin used to collect metrics about other plugins, and it is a de-facto standard in this field. If you are developing a plugin just for your own server, you do not need to worry about bStats. But if your plan is to let other players use it, then it makes sense to integrate bStats.
The process is very simple. All you need is to register on the bStats website, and register a new plugin by clicking on the + Add Plugin button at the top. This will give you a unique code, which from now on will identify your plugin. If you cannot find the ID of your plugin, you can visit this page.
There are then three steps you need to take to ensure bStats is fully integrated with your plugin:
- Download the Metrics.java file compatible with your plugin. bStats provides alternative versions of their Metrics.java file for other platforms, such as Bungeecord, Sponge and Velocity. You can find all of them here.
- Copy the file in your project, making sure to change its package with your own. No other modifications are allowed by bStats!
- Add the following code to your
onEnablemethod:
    @Override
    public void onEnable()
    {
        // All you have to do is adding the following two lines in your onEnable method.
        // You can find the plugin ids of your plugins on the page https://bstats.org/what-is-my-plugin-id
        int pluginId = xxxx; // <-- Replace with the id of your plugin!
        Metrics metrics = new Metrics(this, pluginId);
    }
All statistics collected by bStats are public; for instance, you can see how Telecompass is doing by visiting this page. A really cool feature offered by bStats is the possibility of integrating graphs very easily in your own website, like this one:

To do so, all you need is to include the following image: https://bstats.org/signatures/bukkit/YOUR_PLUGIN_NAME.svg.
Conclusion & Download

You can download the full IntelliJ IDEA project for the Telecompass plugin on Patreon.
The latest compiled version is also available on the following websites:
A big thanks goes to TechnicJelle and Septicuss for their time and support while working on this tutorial!
💖 Support this blog
This website exists thanks to the contribution of patrons on Patreon. If you think these posts have either helped or inspired you, please consider supporting this blog.
📧 Stay updated
You will be notified when a new tutorial is released!
📝 Licensing
You are free to use, adapt and build upon this tutorial for your own projects (even commercially) as long as you credit me.
You are not allowed to redistribute the content of this tutorial on other platforms, especially the parts that are only available on Patreon.
If the knowledge you have gained had a significant impact on your project, a mention in the credit would be very appreciated. ❤️🧔🏻