

Creating believable caustics reflections is something that most technical artists have attempted achieving at some point in their career. If you are a game developer, one of the main reasons to use Twitter is the endless stream of inspiration it can provide. A few days ago Florian Gelzenleuchter (kolyaTQ on twitter) posted a GIF of a caustics effect created in Unity using shaders. The post (below) quickly reached 1.5K likes, showing a genuine interest for this type of content.
Want to have sweet caustics? Here you go:
-> Get a caustics texture (bw)
-> unpack in shader twice and pan at different speed/size
-> blend with min(tex2, tex1)
-> Enjoy!(If you're extra fancy, add some rgb split to the tex!)#screenshotsaturday #unity3d #gamedev #indiedev pic.twitter.com/U9yFAE3eKs
— FLOGELZ (@flogelz) August 24, 2019
While I usually focus on longer, more technical series (such as Volumetric Atmospheric Scattering and Inverse Kinematics), I could not resist the temptation of writing a short and sweet tutorial about Florian‘s effects.
At the end of this article, you will also find a link to download the Unity package with all the assets necessary.
Understanding Caustics
You might be unfamiliar with the terms caustics, although there is no doubt that you are experiencing them every day. Caustics are the light reflections caused by curved surfaces. Generally speaking, any curved surface can behave like a lens, focusing light on some points and scattering it on others. Glasses and water are the most common medium that allows their formation, giving life to the so-called ripple caustics (below).

Caustics can take many other forms. Rainbows, for instance, are optical phenomena that can occur when light is deflected by raindrops. Consequently, they technically are caustics.
Anatomy of the Effect
One very recognisable of ripple caustics is the way they move; something that you have probably experienced if you have ever looked at the bottom of a pool. Recreating actual caustics is very expensive, as it requires the simulation of many rays of light.
Florian managed to create a believable effect starting from a single texture of a caustics. To create this tutorial, I have used the texture below, taken from OpenGameArt.
One important feature that makes this effect working is that the caustic pattern above is tileable. It means that you can place two images next to each other, and they will blend seamlessly. Since we want to use this effect on large surfaces, it is important that we can stretch it without discontinuities that would otherwise break the illusion.
Once this texture is available, Florian suggests three steps:
- Impressing the caustics pattern on a model surfaces twice, each time using different sizes and speeds
- Blending the two patterns using the
minoperator - Splitting the RGB channels during the sampling.
Let’s see how we can achieve each step in Unity.
Creating a Shader
The first step is to create a new shader. Since this effect is likely to be used in a 3D game where real lighting is also present, the best option is to start with a Surface shader. Surface shaders are one of the many types of shaders that Unity supports (others include Vertex and Fragments shaders for unlit materials, Screen shaders for postprocessing effects and Compute shaders for off-screen simulations).
A newly created Surface shader has only a few properties. For this effect, we need to pass more information to the shader. First of all, the caustic texture. Secondly, the parameter used to scale it and offset it.
Let’s create two shader properties:
Properties
{
    ...

    [Header(Caustics)]
    _CausticsTex("Caustics (RGB)", 2D) = "white" {}

    // Tiling X, Tiling Y, Offset X, Offset Y
    _Caustics_ST("Caustics ST", Vector) = (1,1,0,0)
}
and their respective Cg variables:
sampler2D _CausticsTex;
float4 _Caustics_ST;
Shader properties correspond to the fields that appear in the Material inspector in Unity. Their respective Cg variables are the actual values that can be used in the shader code.
As seen above, _Caustics_ST is a float4, meaning that it contains four values. We will use them to control how the caustics texture is sampled. Namely:
_Caustics_ST.x: the scale of the caustics texture on the X axis;_Caustics_ST.y: the scale of the caustics texture on the Y axis;_Caustics_ST.z: the offset of the caustics texture on the X axis;_Caustics_ST.w: the offset of the caustics texture on the Y axis.
_ST. In Unity, _ST can be used to add a few more pieces of information on how a texture is sampled.
For instance, if you create the Cg variable float4 _MainTex_ST, this can be used to decide its size and offset when it is wrapped onto a model.
Usually, _ST variables do not need properties as they appear automatically in the inspector. In this specific case, however, we cannot rely on this since we need to sample the texture twice, each time with a different scale and offset. In the next sections, in fact, we will need to duplicate that variable into two distinct ones.
⭐ Suggested Unity Assets ⭐
Texture Sampling
Every surface shader contains a function, typically called surf, which is used to decide the colour of each pixel being drawn. A “basic” surf function looks like this:
void surf (Input IN, inout SurfaceOutputStandard o)
{
    // Albedo comes from a texture tinted by color
    fixed4 c = tex2D (_MainTex, IN.uv_MainTex) * _Color;
    o.Albedo = c.rgb;
    // Metallic and smoothness come from slider variables
    o.Metallic = _Metallic;
    o.Smoothness = _Glossiness;
    o.Alpha = c.a;
}
The final colour is determined by a series of fields that the shader has to initialise and return in a structure called SurfaceOutputStandard. The field we are interested to change is the Albedo, which loosely corresponds to the colour of an object when lit under white light.
In a newly created surface shader, the albedo comes from the texture, called _MainTex. Since the caustics effect is added on top of the existing texture, we will need to perform an additional texture sampling from _CausticsTex.
A technique called UV mapping allows deciding which part of the texture to sample, based on which part of the geometry we have to render. This is done via uv_MainTex, a float2 which is stored in every vertex of the 3D model and it indicates the coordinate of the texture.
The idea is to use _Caustics_ST to scale and offset the uv_MainTex, so that we can effectively stretch and move the caustics texture on the model.
void surf (Input IN, inout SurfaceOutputStandard o)
{
    // Albedo comes from a texture tinted by color
    fixed4 c = tex2D (_MainTex, IN.uv_MainTex) * _Color;
    o.Albedo = c.rgb;

    // Caustics sampling
    fixed2 uv = IN.uv_MainTex * _Caustics_ST.xy + _Caustics_ST.zw;
    fixed3 caustics = tex2D(_CausticsTex, uv).rgb;

    // Add
    o.Albedo.rgb += caustics;

    // Metallic and smoothness come from slider variables
    o.Metallic = _Metallic;
    o.Smoothness = _Glossiness;
    o.Alpha = c.a;
}
❓ What happens if the Albedo goes above 1? to
to  , although there is no guarantee here that the operation will not cause some of them to go beyond that.
In older shaders, this could have been a problem. In here, it is actually a feature. If the colour of a pixel is above one, it means that its contribution should “leak” beyond its boundaries and affect nearby pixels.
This is exactly what happens when you have very bright specular reflections. However, it is not something that a surface shader will do on its own. In order for this effect to work, your camera needs to have HDR enabled. That stands for High Dynamic Range, and allows colour values to go beyond . You also need a postprocessing effect to actually blur that excessive amount of colour on the nearby pixels.
Unity comes with its own postprocessing stack which contains a bloom filter that does exactly this job. You can read more about that on the Unity blog: PostFX v2 – Amazing visuals, upgraded.
The preliminary result can be seen below:
Animated Caustics
One of the most important features of caustics is the way they move. At the moment, they are statically projected on top of the model as a second texture.
Animating materials in shaders is possible using the _Time property that Unity exposes. It can be used to access the current game time, hence allowing to add time into our equations.
The easiest way is simply to offset the texture based on the current time.
// Caustics UV
fixed2 uv = IN.uv_MainTex * _Caustics_ST.xy + _Caustics_ST.zw;
uv += _CausticsSpeed * _Time.y;

// Sampling
fixed3 caustics = tex2D(_CausticsTex, uv).rgb;

// Add
o.Albedo.rgb += caustics;
The field _Time.y contains the current game time in seconds. If that makes your reflection too fast, you can scale it down with a multiplicative coefficient. This is what the float2 variable _CausticsSpeed has been used for in the code above.
Based on what you want to achieve, you might decide to force the caustics texture to oscillate in a sinusoid fashion instead. It is important to stress that there is no standard way to do this. Based on what you need, you might want your caustics reflections to move in a completely different way.
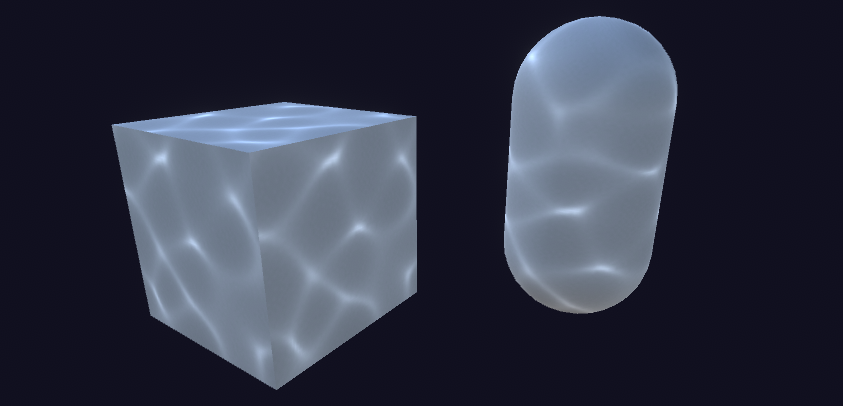
The results, seen below, is still rather underwhelming. That is ok, since there is still a lot left to do to make these caustics reflection look good.
Multiple Sampling
What brings life to the effect, is sampling the caustics textures not once, but twice. Overlapping two of them which are moving at different speeds will make a massive difference.
The first step is to duplicate the _Caustics_ST and _CausticsSpeed properties, so that the two texture samplings can have different scales, offsets and speeds:
[Header(Caustics)]
_CausticsTex("Caustics (RGB)", 2D) = "white" {}

// Tiling X, Tiling Y, Offset X, Offset Y
_Caustics1_ST("Caustics 1 ST", Vector) = (1,1,0,0)
_Caustics2_ST("Caustics 1 ST", Vector) = (1,1,0,0)

// Speed X, Speed Y
_Caustics1_Speed("Caustics 1 Speed", Vector) = (1, 1, 0 ,0)
_Caustics2_Speed("Caustics 2 Speed", Vector) = (1, 1, 0 ,0)
When you have two caustics samples available, they can be blended using the min operator. Simply averaging them will not yield a good result.
// Caustics samplings
fixed3 caustics1 = ...
fixed3 caustics2 = ...

// Blend
o.Albedo.rgb += min(caustics1, caustics2);
Such a small change, makes an enormous difference:
To keep your code tidy, you can also wrap the caustics sampling code in its own function:
// Caustics
fixed3 c1 = causticsSample(_CausticsTex, IN.uv_MainTex, _Caustics1_ST, _Caustics1_Speed);
fixed3 c2 = causticsSample(_CausticsTex, IN.uv_MainTex, _Caustics2_ST, _Caustics2_Speed);

o.Albedo.rgb += min(c1, c2);
RGB Split
There is one final trick that we can use to make these caustics reflections look good. Different wavelengths of light diffract differently when passing through a medium. This means that light can “split” into different colours, when it moves through water.
To simulate this effect, we can split each caustics sample into three. One for each colour channel. By sampling the red, green and blue channels with a slight offset, we can cause the colours to misalign.
Let’s start by adding a _SplitRGB property, which indicates how strong the split effect will be:
// Caustics UV
fixed2 uv = IN.uv_MainTex * _Caustics_ST.xy + _Caustics_ST.zw;
uv += _CausticsSpeed * _Time.y;

// RGB split
fixed s = _SplitRGB;
fixed r = tex2D(tex, uv + fixed2(+s, +s)).r;
fixed g = tex2D(tex, uv + fixed2(+s, -s)).g;
fixed b = tex2D(tex, uv + fixed2(-s, -s)).b;

fixed3 caustics = fixed3(r, g, b);
Deciding how to offset the RGB channels is pretty much an arbitrary choice. But even using such simple offsetting produces a very convincing look:
Conclusions & Downloads
If you are interested in learning how tileable caustics textures can be created, Periodic Caustic Textures is an interesting read.
In the meantime, Florian is still working on his caustics shader and has some pretty neat improvements you might want to have a look at.
Caustics Part 2/2✨
Here's another look at it, moving objects through the water. Works on everything, that's writing to the depth buffer!
I'm gonna explain a bit more how this works in the comments~#screenshotsaturday #unity3d #madewithunity #gamedev #indiedev #shader pic.twitter.com/dTo602BpCo
— FLOGELZ (@flogelz) August 31, 2019
The full package for this tutorial is available on Patreon, and it includes all the assets necessary to reproduce the technique here presented. The package has been exported using Unity 2019.2, and requires the Postprocessing Stack v2.
-
Standard Asset: shader file only
-
𝗣𝗥𝗘𝗠𝗜𝗨𝗠 Assets: full scene, including caustics texture and materials.
💖 Support this blog
This website exists thanks to the contribution of patrons on Patreon. If you think these posts have either helped or inspired you, please consider supporting this blog.
📧 Stay updated
You will be notified when a new tutorial is released!
📝 Licensing
You are free to use, adapt and build upon this tutorial for your own projects (even commercially) as long as you credit me.
You are not allowed to redistribute the content of this tutorial on other platforms, especially the parts that are only available on Patreon.
If the knowledge you have gained had a significant impact on your project, a mention in the credit would be very appreciated. ❤️🧔🏻
How would we make it so different objects share caustics?
Right now using your implementation each object has seperate caustics which doesnt look so good.
There must be some sort of way to get this to work with the depth buffer to allow either shared caustics or blending of them?
What do you mean exactly with “sharing caustics”?
If you use the same material, all objects will have the same effect applied on them.
What might be different is that, based on the UV mapping, the scale might be different. Is that what you are referring to?
Late to the party here, but one way I tweaked this is to use Triplanar mapping rather than simple UV offsetting.
That makes the scale/placement of the texture independent of the UV map, so side-by-side objects should have a continuous effect. It has the bonus advantage that it works slightly better with moving objects, since it doesn’t “drag” the caustics along with them.
Worth checking out for those with similar questions!
I’m very new to shaders here. The declaration of causticsSample function seems to be missing from the tutorial, how do you declare it?
Hey, could I get you to spell a few more things out? I’m new enough to Unity that some things aren’t as obvious to me. For example, both you and Flogelz refer to applying the texture as a single object even though it’s a series of images. I must be missing something.
Also in your code it would be super helpful to spell out which section things go under. Like right now I’m assuming that the variables like sampler2D _CausticsTex; etc go in SubShader{} because that’s where I see all of the other variables defined. But I’m not sure whether I should replace the _MainTex declaration. These little things are super helpful to the less experienced.
Thanks!
> For example, both you and Flogelz refer to applying the texture as a single object even though it’s a series of images.
It’s not a series of images! I am using only ONE texture, which is the tileable caustics texture I’m showing at the beginning of the article. The effect looks animated because I’m “applying” the texture multiple times, each time moving it a bit. But it is still a single texture!
For the code, shaders are very tricky! Have a look at this article here, which covers a lot of their quirky syntax: https://www.alanzucconi.com/2015/06/10/a-gentle-introduction-to-shaders-in-unity3d/
I hope this helps!
Don’t know if you still read these, but why do we add to the final colour rather than multiply? Wouldn’t add cause values in the float3 colour to exceed 1 and cause problems ?
You’re right! We are adding it, because this is effectively an extra light contribution. When the value goes beyond 1, that is actually desirable! Because that value can be used along a bloom filter to have those bits “shining”.